Numbers Station is partnered with Databricks, and we are big fans of the work they are doing to support running foundation models on their platform. Bringing AI to the data stack is the future of data systems and Databricks is a pioneer in providing the infrastructure for this, and Numbers Station is a pioneer in verticalizing AI for analytics applications. Running models directly in Databricks allows users to query powerful models on the same platform as their data, which improves performance, simplifies system architectures, and provides better privacy.
We wanted to document our experience setting up this relatively new platform based on their documentation and Python SDK. Note that while their Python SDK is technically in beta, Databricks still considers it ready for production, and has customers and partners that use it in production.
In this post, we’ll provide you with example Python scripts which use their SDK and can be used to programmatically log and model in Unity Catalog, and then create a model serving endpoint from that model. Our example will focus on Azure, but a very similar process works for AWS as well.
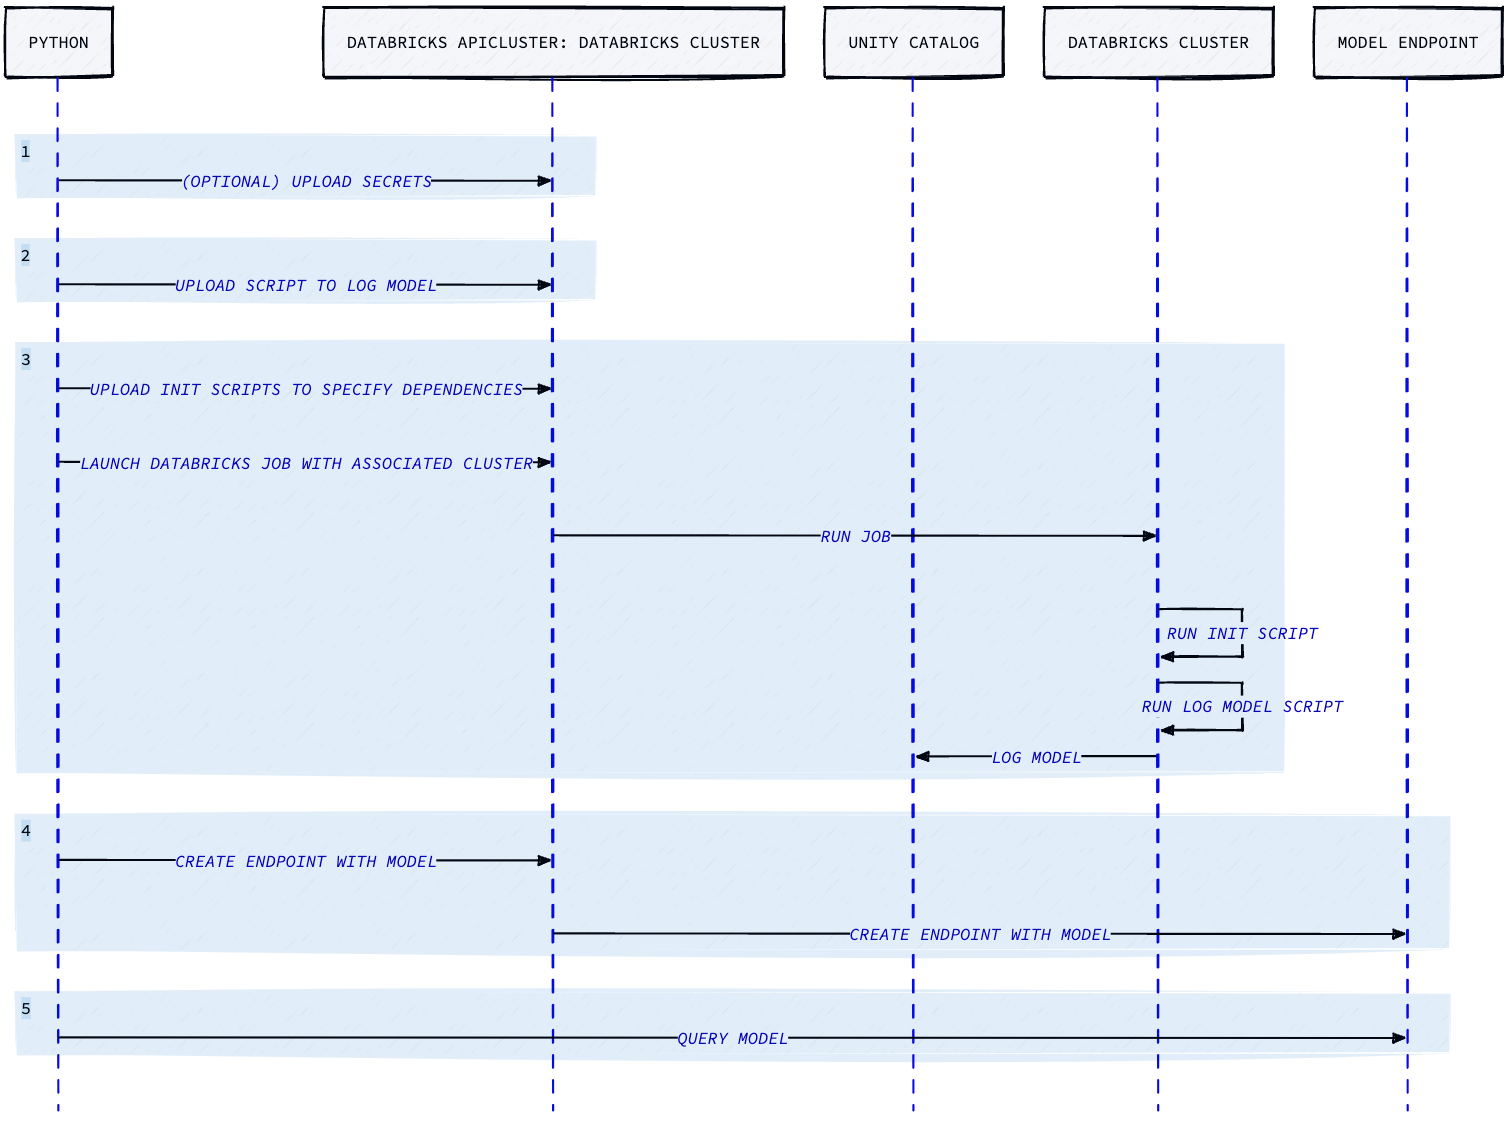
The process will cover 5 general steps: (1) preparing secrets, (2) uploading scripts, (3) preparing Job Clusters and running the Job, (4) creating the model endpoint, and (5) querying the endpoint to make sure it worked as intended.
Prerequisites
This blog post assumes basic familiarity with Databricks. Ensure that you have a Databricks Workspace set up with access to Unity Catalog. This post also assumes familiarity with Python.
Setup a Service Principal Account
For programmatic access via a script, we use a service principal account. Please follow the instructions linked.
In addition, we need to make sure that the service principal account has the correct permissions. In particular, ensure that the “Allow cluster creation” and “Allow workspace access” Entitlements are enabled in the Admin console when creating the service principal. We do not need the service principal to be an account admin.
Enable use of Personal Access Tokens (PATs)
Ensure that PATs are allowed in your Workspace settings. Note that at least one user in the workspace must already have a PAT (i.e., a workspace admin), in order for the “Permission Settings” box to be enabled.
Generate a PAT for the Service Principal
Follow these instructions to generate a PAT for the service principal account. Note that it may take a few minutes for the permission settings to save and propagate.
Create a Metastore (if one doesn’t already exist)
In order to log the models in Unity Catalog, we need a metastore attached to the workspace. If you already have one, you can skip this step. Otherwise, follow these instructions.
Ensure the Service Principal has Permissions
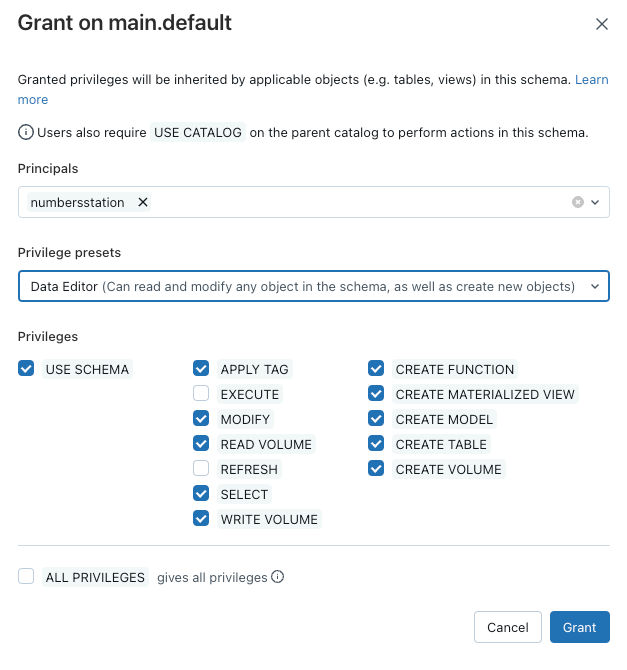
Once we have a metastore, we need to ensure that the service principal has the correct privileges on the Catalog that we will be storing models in. Specifically, we use the “Data Editor” privilege preset to ensure that we have the permissions necessary to use the schema, create models, etc.
For example, this is what the UI looks like for granting the numbersstation service principal “Data Editor” privileges.
Python Dependencies
Finally, you need the following Python dependencies on the machine you’re using to follow this example. We recommend using a Python virtualenv. We list the exact version used for this tutorial below, newer versions may be available, but might require code adjustments.
click==8.1.7
databricks-sdk==0.14.0
requests==2.31.0
structlog==23.1.0
GPU Model Serving with Python
Given the service principal account credentials, the process we follow is
- Upload the secrets necessary for getting custom weights (optional)
- Upload a Python script for logging a model to Unity Catalog
- Creating a Databricks Job to run the script (as well as a corresponding Job Cluster with an init script)
- Creating the model-serving endpoint with this newly created model
- Querying the model to verify it is functional
Authenticate
In order to work with the Databricks Python SDK, we first need to authenticate. Doing so requires the host of the databricks workspace, and the access token.
from databricks.sdk import WorkspaceClient

HOST = "abc-123123123123123.azuredatabricks.net"
TOKEN = "dapi123123123123"

w = WorkspaceClient(host=HOST, token=TOKEN)
Uploading Secrets (optional)
If you need to load custom weights (e.g., stored in Amazon S3 as an example) and doing so requires secrets accessible to the job, we do that next. If you don’t need any secrets in your environment (e.g., you’re just loading pre-trained weights), then you can skip this step.
SCOPE = "your_organization"
SECRET_KEY = "your secret"

try:
    w.secrets.create_scope(scope=SCOPE)
except DatabricksError as e:
    if "already exists" in str(e):
        pass
    else:
        raise

# As an example, we set an AWS access key id and secret access key.
w.secrets.put_secret(
    scope=SCOPE,
    key="aws-access-key-id",
    string_value="ABC123",
)
w.secrets.put_secret(
    scope=SCOPE,
    key="aws-secret-access-key",
    string_value=SECRET_KEY,
)
Upload Script to Log Model
Next, we upload a script to log a model to the Unity catalog. First, let’s start with log_model.py, which is the script that will log a model when executed in Databricks. In the example below, we also show how custom weights can be loaded from S3 using the secrets we added in step 1.
"""Log a model to Unity Catalog."""
import os
import tarfile

import mlflow
import numpy as np
import torch
from cloudpathlib import CloudPath
from mlflow.models.signature import ModelSignature
from mlflow.types.schema import ColSpec, Schema
from transformers import AutoModelForCausalLM, AutoTokenizer
SCOPE = "your_organization"

# OPTIONAL: If you want to load a custom model from s3, you
# can do something like the following rather than loading
# a pretrained model.
#
# # Grab the model from s3 using secrets
# os.environ["AWS_ACCESS_KEY_ID"] = dbutils.secrets.get(
#     scope=SCOPE, key="aws-access-key-id"
# )
# os.environ["AWS_SECRET_ACCESS_KEY"] = dbutils.secrets.get(
#     scope=SCOPE, key="aws-secret-access-key"
# )
# model_dir = CloudPath("s3://your-org-ml-models/")
# model_path = model_dir / "codellama-13b.tar.gz"

# # Local, ephemeral location in the cluster
# extract_dir = "/tmp/codellama-13b"
# with tarfile.open(model_path, "r:gz") as tar:
#     tar.extractall(path="/tmp")

# model = AutoModelForCausalLM.from_pretrained(extract_dir, torch_dtype=torch.bfloat16)
# tokenizer = AutoTokenizer.from_pretrained(extract_dir)

# Load a pretrained model
model = AutoModelForCausalLM.from_pretrained(
    "codellama/CodeLlama-13b-hf", torch_dtype=torch.bfloat16
)
tokenizer = AutoTokenizer.from_pretrained("codellama/CodeLlama-13b-hf")
tokenizer.model_max_length = model.config.max_position_embeddings

# Define the model input and output schema
input_schema = Schema(
    [
        ColSpec("string", "prompt"),
        ColSpec("double", "temperature", optional=True),
        ColSpec("integer", "max_tokens", optional=True),
        ColSpec("string", "stop", optional=True),
        ColSpec("integer", "candidate_count", optional=True),
    ]
)

output_schema = Schema([ColSpec("string", "predictions")])

signature = ModelSignature(inputs=input_schema, outputs=output_schema)

# Define an example input
input_example = {
    "prompt": np.array(
        [
            "Below is an instruction that describes a task. "
            "Write a response that appropriately completes the request.\n\n"
            "### Instruction:\n"
            "What is Apache Spark?\n\n"
            "### Response:\n"
        ]
    )
}

mlflow.set_registry_uri("databricks-uc")
CATALOG = "ml"
SCHEMA = "default"
registered_model_name = f"{CATALOG}.{SCHEMA}.CodeLlama-13b-hf"

# Start a new MLflow run, with a path to store it in databricks
mlflow.set_experiment("/Shared/numbersstation/tmp-experiment")
with mlflow.start_run():
    components = {
        "model": model,
        "tokenizer": tokenizer,
    }
    mlflow.transformers.log_model(
        transformers_model=components,
        task="text-generation",
        artifact_path="model",
        registered_model_name=registered_model_name,
        signature=signature,
        input_example=input_example,
        metadata={"task": "llm/v1/completions"},
    )
Then, we can upload this script using the following. Note that the script below assumes log_model.py is in the same directory.
from pathlib import Path

WORKSPACE_ROOT = "/Shared/numbersstation"
WORKSPACE_PATH = WORKSPACE_ROOT + "/log_model.py"

src = Path(__file__).resolve().parent.joinpath("log_model.py")

w.workspace.mkdirs(WORKSPACE_ROOT)

with open(src, "rb") as file:
    w.workspace.upload(WORKSPACE_PATH, file, overwrite=True)
This will upload our log_model.py script to the location specified.
Create a Databricks Cluster to Run (with init scripts)
Note that log_model.py has several dependencies (e.g., cloudpathlib). We can ensure the Job Cluster which executes the script has the dependencies by uploading an init script.
Here’s an example for our specific log_model.py script. Let’s name this one log_model_init.sh.
#!/bin/bash

/databricks/python/bin/pip install -U mlflow
/databricks/python/bin/pip install -U transformers==4.34.1
/databricks/python/bin/pip install -U accelerate
/databricks/python/bin/pip install -U cloudpathlib[all]
Note that we use the full paths to pip as used to be recommended by the Databricks docs. Also note that Databricks has moved to using policies for these library dependencies.
Next, we upload the script
"/log_model_init.sh"

src = Path(__file__).resolve().parent.joinpath("log_model_init.sh")
w.workspace.mkdirs(WORKSPACE_ROOT)
with open(src, "rb") as file:
    w.workspace.upload(INIT_PATH, file, format=ImportFormat.AUTO, overwrite=True)
With those prerequisites prepared, we can use the Databricks Python SDK to actually run the job which will log the model.
import datetime
from pathlib import Path

import structlog
from databricks.sdk import WorkspaceClient
from databricks.sdk.core import DatabricksError
from databricks.sdk.service import jobs
from databricks.sdk.service.compute import (
    AzureAttributes,
    AzureAvailability,
    ClusterSpec,
    DataSecurityMode,
    InitScriptInfo,
    WorkspaceStorageInfo,
)
from databricks.sdk.service.workspace import ImportFormat

log = structlog.get_logger()
latest_ml_runtime = w.clusters.select_spark_version(latest=True, ml=True, gpu=False)
user_name = w.current_user.me().user_name
date = datetime.datetime.now(datetime.timezone.utc).isoformat()
run_name = f"numbersstation-modelserve-{date}"
waiter = w.jobs.submit(
    run_name=run_name,
    tasks=[
        jobs.SubmitTask(
            task_key="numbersstation-model_serve",
            # Note that this cluster will automatically terminate, and then automatically
            # delete in databricks after 30 days.
            new_cluster=ClusterSpec(
                # Since sometimes instances are not available in specific zones
                azure_attributes=AzureAttributes(
                    first_on_demand=1,
                    availability=AzureAvailability.ON_DEMAND_AZURE,
                    spot_bid_max_price=-1,
                ),
                spark_version=latest_ml_runtime,
                # Single-node seems sufficient.
                num_workers=1,
                # Somewhat arbitrarily chosen, depends on your model.
                node_type_id="Standard_E8s_v3",
                # Needed to get access to Unity Catalog
                data_security_mode=DataSecurityMode.SINGLE_USER,
                init_scripts=[
                    InitScriptInfo(
                        workspace=WorkspaceStorageInfo(destination=INIT_PATH)
                    )
                ],
                single_user_name=user_name,
            ),
            notebook_task=jobs.NotebookTask(
                notebook_path=WORKSPACE_PATH, source=jobs.Source.WORKSPACE
            ),
        )
    ],
)
log.info("started job", run_id=waiter.run_id)


def print_status(run: jobs.Run):
    """Callback that receives a polled entity between state updates."""
    statuses = [f"{t.task_key}: {t.state.life_cycle_state}" for t in run.tasks]
    log.info("workflow intermediate status", statuses=statuses)


# This takes a long time
run = waiter.result(timeout=datetime.timedelta(minutes=60), callback=print_status)
log.info("job finished", page_url=run.run_page_url)
Note that we use the full paths to pip as used to be recommended by the Databricks docs. Also note that Databricks has moved to using policies for these library dependencies.
Next, we upload the script
INIT_PATH = WORKSPACE_ROOT + "/log_model_init.sh"

src = Path(__file__).resolve().parent.joinpath("log_model_init.sh")
w.workspace.mkdirs(WORKSPACE_ROOT)
with open(src, "rb") as file:
    w.workspace.upload(INIT_PATH, file, format=ImportFormat.AUTO, overwrite=True)
With those prerequisites prepared, we can use the Databricks Python SDK to actually run the job which will log the model.
import datetime
from pathlib import Path

import structlog
from databricks.sdk import WorkspaceClient
from databricks.sdk.core import DatabricksError
from databricks.sdk.service import jobs
from databricks.sdk.service.compute import (
    AzureAttributes,
    AzureAvailability,
    ClusterSpec,
    DataSecurityMode,
    InitScriptInfo,
    WorkspaceStorageInfo,
)
from databricks.sdk.service.workspace import ImportFormat

log = structlog.get_logger()
latest_ml_runtime = w.clusters.select_spark_version(latest=True, ml=True, gpu=False)
user_name = w.current_user.me().user_name
date = datetime.datetime.now(datetime.timezone.utc).isoformat()
run_name = f"numbersstation-modelserve-{date}"
waiter = w.jobs.submit(
    run_name=run_name,
    tasks=[
        jobs.SubmitTask(
            task_key="numbersstation-model_serve",
            # Note that this cluster will automatically terminate, and then automatically
            # delete in databricks after 30 days.
            new_cluster=ClusterSpec(
                # Since sometimes instances are not available in specific zones
                azure_attributes=AzureAttributes(
                    first_on_demand=1,
                    availability=AzureAvailability.ON_DEMAND_AZURE,
                    spot_bid_max_price=-1,
                ),
                spark_version=latest_ml_runtime,
                # Single-node seems sufficient.
                num_workers=1,
                # Somewhat arbitrarily chosen, depends on your model.
                node_type_id="Standard_E8s_v3",
                # Needed to get access to Unity Catalog
                data_security_mode=DataSecurityMode.SINGLE_USER,
                init_scripts=[
                    InitScriptInfo(
                        workspace=WorkspaceStorageInfo(destination=INIT_PATH)
                    )
                ],
                single_user_name=user_name,
            ),
            notebook_task=jobs.NotebookTask(
                notebook_path=WORKSPACE_PATH, source=jobs.Source.WORKSPACE
            ),
        )
    ],
)
log.info("started job", run_id=waiter.run_id)


def print_status(run: jobs.Run):
    """Callback that receives a polled entity between state updates."""
    statuses = [f"{t.task_key}: {t.state.life_cycle_state}" for t in run.tasks]
    log.info("workflow intermediate status", statuses=statuses)


# This takes a long time
run = waiter.result(timeout=datetime.timedelta(minutes=60), callback=print_status)
log.info("job finished", page_url=run.run_page_url)
Create a Model-serving Endpoint
Once the model is logged in the Unity Catalog, we can easily create a model-serving endpoint with the SDK. Note that this is using old APIs, and Databricks recently put provisioned throughput APIs into public preview.
from databricks.sdk.service.serving import (
    EndpointCoreConfigInput,
    ServedModelInput,
    ServingEndpointDetailed,
)

latest_version = str(
    next(w.model_versions.list("ml.default.CodeLlama-13b-hf")).version
)
waiter = w.serving_endpoints.create(
    name="ns-codellama-13b-hf",
    config=EndpointCoreConfigInput(
        served_models=[
            ServedModelInput(
                model_name="ml.default.CodeLlama-13b-hf",
                model_version=latest_version,
                workload_size="Small",
                # 1x A100 (80GB)
                workload_type="GPU_LARGE",
                scale_to_zero_enabled=False,
            )
        ],
    ),
)
log.info("started creating endpoint", endpoint_name=waiter.name)

def print_status(endpoint: ServingEndpointDetailed):
    """Callback that receives a polled entity between state updates."""
    log.info("endpoint state", state=endpoint.state)

# This takes a long time
run = waiter.result(timeout=datetime.timedelta(minutes=120), callback=print_status)
log.info("endpoint created", name=run.name)
Verify the Endpoint
Once the endpoint is created, you can query it to make sure it is running.
import requests
import json

url = f"https://{HOST}/serving-endpoints/ns-codellama-13b-hf/invocations"
data = {
    "inputs": {
        "prompt": [
            "Below is an instruction that describes a task. Write a response that appropriately completes the request.\n\n### Instruction:\nWhat is Apache Spark?\n\n### Response:\n"  # noqa: E501
        ]
    },
    "params": {"max_tokens": 100, "temperature": 0.0},
}
headers = {
    "Context-Type": "application/json",
    "Authorization": f"Bearer {TOKEN}",
}

response = requests.post(
    url=url,
    json=data,
    headers=headers,
)

print(json.dumps(response.json()))
Conclusion
Hopefully, this post has helped with a few things. First, even though the beta Python SDK doesn’t have great documentation, this example code demonstrates it is possible to accomplish what you want by examining the source code for the library, identifying the corresponding configuration classes, and using them. Second, this post should provide a high-level overview of the pieces needed to programmatically log a model (perhaps with custom weights) and get a model serving endpoint. Finally, we hope if you made it this far, you’ll find that the process is relatively straightforward. We give big props to Databricks here for making APIs and SDKs that let companies like ours spin things up like this. If you have any questions, feel free to reach out to info@numbersstation.ai .